GNS3 0.8.1 VirtualBox Edition Installation and configuration:

GNS3 0.8.1 VirtualBox Edition release few time back. New version have many improvements and fixed bugs. In this post i will show you that how to install and configure this new version on windows 7. First download this from internet, make sure u download the correct one that is GNS3 v0.8.1 VBE all-in-one. Which include the following software packages 

  • pathon 
  • Pyqtgpl
  • pywin32
  • WinPCAP
  • wire shark
Start the set up wizard by click on setup file wizard will start and install all above packages one by one. 
Process started with gns3 installation...


Then Pathon and pyqt GPL installation starts.


Winpcap Installation


Wireshark Installation

After installation it prompt for dynamips setting, use the default setting click on test button to confirm the setting.


How to fix Generic Host Process For win32 services has encountered a problem and needs to close | windows (active directory) server Solution

Here are some possible solutions for  "Generic Host Process For Win32 Services Encountered A Problem and needs to close."
  
This article include solutions for this error for both Domain host Having this Problem and stand alone local PC.
Solution for Generic Host Process For Win32 Services for Domain User (Microsoft Active directory user):


  • If a Microsoft Active directory user have this issue then log on to that PC with administrator account or with any other domain user and check that windows again show this error or not.
  • If not then rename that user profile. For windows XP you can find profile from c:\document and setting\ and in windows 7 you find this profile folder at C:\Users. e.g. user viki have this problem then you need to rename this viki folder with any other name like viki1.
  • Now log on again with that user having "Generic Host Process For Win32 error" after login. This time system will not find any profile for that user and will create a new profile for this user. 
  • After login this error will not be shown and if it shown again then you need to run a system repair.

Solution for Generic Host Process For Win32 Services for Stand alone user:

  • You can also try above mention solution for stand alone PC.
  • Open the registry by typing regedit in run and go to KEY_LOCAL_MACHINE\System\CurrentControlSet\Services\NetBT\Parameters and find the file TransportBindName in left dialog box and set it value to blank.

That all for my end hope Your problem will resolve from my experience thanks.

What is BGP Border Gateway Protocol

BGP stands for "border gateway protocol". BGP is protocol of internet, ISPs used this protocol for routing. BGP belongs to EGP(exterior gateway protocol). There are two types of protocol i.e. EGP and IGP.
IGP (Interior gateway protocol) made the network to work in an organization where as EGP is used for communicating two AS (autonomous systems). In start EGP is himself a protocol, now this become a category.


BGP Facts:

  • BGP have Multihoming and use shortest path among the two or more ISPs
  • BGP runs on top of TCP (port 179)
  • BGP updates are triggered, only change is send to neighbours not the whole routing table
  • BGP routing table can be of >100 MB
BGP Routing Algorithms:  


BGP is technically a distance vector protocol, but mostly call it a path vector protocol. Without tuning  BDP behaves just like RIP, use hop-count for shortest path but hope-count in this case is a AS or ISP


BGP Tables:
 Three tables in BGP that are as follow:

  1. Neighbour Table: The directly connect BGP friends.
  2. BGP Table: A list of all GBP routes this can be big.
  3. Routing Table: Contain the best Path.
Learn More About by visiting this article: BGP Interview Questions for network Job

GNS3 Installation on Ubuntu 11.04 | Network Simulator for Ubuntu


There are some different ways to install softwares and packages for Ubuntu, you can install software by console interface. But in this post i am using an easy way to install GNS3 on Ubuntu 11.04.

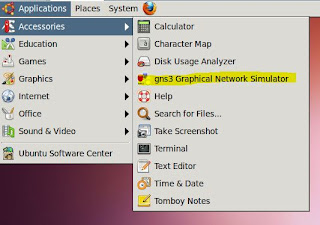
First open Ubuntu Software Center from Application\Ubuntu Software Center and click on "get software" tab and type gns3 and press search button.
In search result you will find "gns3 Graphical Network Simulator" click on install button. Then it will ask you for administrator password, type tour password.
After this installation process will start which will take a few minutes to complete.

After the successful installation you can run GNS3 from Application\Accessories\GNS3. You can see installation process video on you tube by clicking this link: Easy way to install gns3 on ubuntu 11.04


thanks.


How to install flash player on Ubuntu 11.04 | Linux software install

In this post i will show you that how to install flash plugin for Ubuntu 11.04. There are some other ways to install the software on Ubuntu but i am using a very easy way to install flash plugin on Ubuntu.

  • First click on application\ Ubuntu software center, which will open the add and remove software utility for Ubuntu.

  •  Then click on get software and in search field type key word "flash plugin". Select your required flash player as i am selecting flash player for Mozilla. Click on install button, then it will ask you to enter your administrative log in password and installation process will start.


  •  This may take a few minutes and after the installation you can verify this by clicking on "Installed Software" button, there you will find the flash plugin software.

Ubuntu Virtualization | Installation of ubuntu-11.04 on Vmware with Windows 7

What is Virtualization:

Virtualization is trend that is swaping IT envirment and adding virtual machines in our data centers. According to one report there are more than 6 mission intel servers in data centers all over the world. These server are running only one application and one operating system at a time.  These are high cost solution for IT organization. Average utlization of each server is 6-12 %.
By Virtualization tecnology you can run multiple applications and OS on single server Hardware. Each virtual  OS have its own CPU including its own Memory Disk storage and Ethernet. 


Ubuntu11.04 on Vmware
Vmware is best virtualization software for ubuntu. Today i will show you that how to install Ubuntu 11.4 on Vmware with windows 7. Installing Ubuntu on vmware is a piece of cake. You need to just follow the simple steps. 

  • First you need a Ubuntu 11.4 DVD or ISO image file. 
  • Start Vmware 7 and click on new virtual machine, give name to new VM machine and then this wizard will asked you to identify the Ubuntu image and RAM and disk storage. I select the 512 RAM and 20GB disk, you can define yours.
  • Complete this wizard and start your VM. Ubuntu booting process will start.
  • Then select your language.

  • After this Ubuntu 11.4 installation process is start.


  • This installation process will take 20-30 minutes to complete and after this a log in screen will appear click on login icon and enjoy the beautiful interface of Ubuntu Linux OS.


Convert DMG to ISO using dmg2img with PowerISO on windows 10 8.1 | dmg to iso | inflation failed

How to Convert DMG image to ISO:

In this small article i will show you how to convert .dmg image file to an .iso image.
What is a DMG file?
Dmg is image file extension for Mac OS, where as extension like ISO and BIN are related to windows image files. You can open .DMG File on Mac with MAC applications.
You cannot use DMG file on windows you need to convert this type to some windows know extension like ISO. dmg2img is dmg to iso converter.
Following are step for converting a .dmg to .iso using dmg2img
Step-1:
Download and extract dmg2img, you can easily download free this software from internet. After the extraction you will find following three files.


Step-2:
Open the command promt by typing "cmd" in run.


Step-3: 
To convert a dmg into iso using dmg2img you need to type the command according to following syntax.
dmg2img <source dmg file Directory(location)> <Destination iso image location>
In my case these parameters are as follow:
dmg2img software Location: C:\mac
DMG image Location: C:\mac\mac.dmg
Destination iso : C:\mac\mac7.iso
So first open the mac folder in cmd using cd "C:|mac" and then type the command
dmg2img  C:\mac\mac.dmg  C:\mac\mac7.iso


press enter and converting process is start and new iso imag is appear in mac folder.


Convert DMG into ISO on windows 10 using PowerISO | 2nd method

PowerISO is a a CD / DVD image file processing tool, which allows you to open, extract, burn, create, edit, compress, encrypt, split and convert image files, and mount ISO files with internal virtual drive. You can download it from http://www.poweriso.com/ . Install it on your PC and then perform following steps for conversion of DMG into ISO.

v  Start the PowerISO.
v  Open “Tools > Convert" Menu.


v  An Image Converter dialog will be appear.
v  Choose the source DMG file you want to convert.
v  Set the output file format to iso file.
v  Give the output file name (see the figure for more details).


v  Then press OK, it will start converting yout DMG file into ISO file


Related Post:
DMG to ISO MAC
If you are getting message "inflation failed" error while converting DMG to ISO then you can review comments section for resolution.  

Cisco AAA Radius Server Configuration on GNS3


In this tutorial I will explain shortly what is AAA and how to enable AAA on a Cisco router and some basic AAA authentication configuration. Please note that this is only about the router end configuration.
What is AAA?
AAA services are like a security package, which provides a massive security to a device.
AAA stands for Authentication, authorization and accounting.

Authentication: 
Validate who you are, instead of enable secret now u have username and password to login.
Authorization:  
Tells you what you can do. Define different user’s privileges and access levels. 
Accounting:  
Use for monitoring and for keeping history. Tracks what you did on a device.

By using AAA u can control PPP links, aux port, dialup modem, VTY, VPN access anything that required password.
AAA Protocols:
There are two famous protocols use for AAA services that are
ü  Radius
ü  Tacacs
Radius server is open standard where as Tacacs+ server is Cisco proprietary. You can also use the Microsoft Active directory services as AAA server.  

For AAA demonstration I have created the following topology in which R1 is enabled for AAA authentication. In first step I have created an AAA authentication group named “viki-group” in which I define server-group priority and  radius server address which is not present here but due to priority router first look for an Radius server and then authenticate user from their local database . Second step is enable AAA for your required service in my case I enabled it for VTY access.  

R1 config:

R1(config)#int s1/0
R1(config-if)#ip add 1.1.1.1 255.255.255.0
R1(config-if)#no shut
R1(config)#aaa new-model
R1(config)#aaa authentication login viki-login group radius local                 (Server priority)
R1(config)#radius-server host 192.168.1.1 key password                          (Server Address)
R1(config)#username viki password cisco                                               (Local user Database)

R1(config)#line vty 0 4
R1(config-line)#password cisco
R1(config-line)#login authentication viki-login                       (enable AAA for Telnet access)
R1(config-line)#ex

Radious Configuration:

Radious(config)#int s1/0
Radious(config-if)#ip add
Radious(config-if)#ip address 1.1.1.2 255.255.255.0
Radious(config-if)#no shu
Radious(config-if)#no shutdown

For verification telnet to 1.1.1.1 and now router authenticate you with a user name and password.


Site to Site VPN CLI configuration on Gns3:


What is a VPN?
A Virtual Private Network is a type of a connection that connects remote user s to their central office using internet. An IPSEC VPN is virtual tunnel through your public ISP network. VPN are highly encrypted and  secure connections.

PPTP vs OpenVPN

how to setup a vpn on Cisco:
This article is about the VPN site to site CLI configuration on GNS3, It’s not so much the commands.
 I shall divide these configurations into few parts to make it easy to understand i.e.
1.    Define isakmp policy and transform set:
Isakam is the protocol that allow all of keys exchange to happen automatically no need to manually configure the VPN. In this step we shall define authentication type, encryption type, hash. Lifetime and define what session keys are used.
2.      Create an ACl
Define interesting traffic using an access control list, this ACL is not for deny or permitting some IP addresses but it just says which addresses are encrypted     
3.      Set up cryto Map and assign this to interface: 
      In this step we shall tie up all piece so that we can apply to an interface

For site to site VPN configuration I have created the following lab in gns3, in this US and Pakistan are our end site routers and IPS cloud is representing the internet cloud but don’t confuse with this cloud this is a simple router with 7200 series IOS, I have changed the router symbol from gns3/edit/symbol manager to give real environment look to my topology. Complete configurations are given below. 

Us site config:

US(config)#int s1/0
US(config-if)#ip address 50.0.0.1 255.255.255.0
US(config-if)#no shut
US(config)#int loop 1
US (config-if)#ip address 10.1.1.1 255.255.255.0
US(config)#router rip
US(config-router)#version 2
US(config-router)#network 10.1.1.0
US(config-router)#network 50.0.0.0
US(config-router)#no auto-summary


Step-1 :
US(config)#crypto isakmp policy 7
US(config-isakmp)#authentication pre-share
US(config-isakmp)#encryption aes 128
US(config-isakmp)#group 2
US(config-isakmp)#hash sha
US(config-isakmp)#lifetime 100
US(config-isakmp)#ex
US(config)#crypto isakmp key 0 vpnkey address 192.168.1.1 no-xauth
 
US(config)#crypto ipsec transform-set vpntrans esp-aes 128 esp-sha-hmac

Step-2

US(config)#ip access-list extended vpn-acl
US(config-ext-nacl)# permit ip 50.0.0.0 0.0.0.255 172.16.0.0 0.0.255.255

Step-3

US(config)#crypto map vpn-map 10 ipsec-isakmp
US(config-crypto-map)#set peer 192.168.1.1
US(config-crypto-map)#match address vpn-acl
US(config-crypto-map)#set transform-set vpntrans
 
US(config)#int s1/0
US(config-if)#cry
US(config-if)#crypto map vpn-map

ISP configuration:

ISP#conf t
ISP(config)#int s1/0
ISP(config-if)#ip add 50.0.0.2 255.255.255.0
ISP(config-if)#no shut
ISP(config-if)#ex
ISP(config)#int s1/1
ISP(config-if)#ip add 192.168.1.2 255.255.255.0
ISP(config-if)#no shut
ISP(config)#router ri
ISP(config-router)#version 2
ISP(config-router)#network 50.0.0.0
ISP(config-router)#network 192.168.1.0
ISP(config-router)#no auto-summary

Pakistan site config:

Step-1 :
Pakistan#conf t
Pakistan(config)#crypto isakmp policy 7
Pakistan(config-isakmp)# authentication pre-share
Pakistan(config-isakmp)#encryption aes 128
Pakistan(config-isakmp)# group 2
Pakistan(config-isakmp)# lifetime 100
Pakistan(config-isakmp)#crypto isakmp key 0 vpnkey address 50.0.0.1 no-xauth
Pakistan(cfg-crypto-trans)#ex
Pakistan(config)#crypto ipsec transform-set vpntrans esp-aes  esp-sha-hmac

Step-2

Pakistan(config)#ip access-list extended vpn-acl
Pakistan(config-ext-nacl)# permit ip 172.16.0.0 0.0.255.255 50.0.0.0 0.0.0.255
Pakistan(config-ext-nacl)#ex

Step-3

Pakistan(cfg-crypto-trans)#crypto map vpn-map 10 ipsec-isakmp
Pakistan(config-crypto-map)# set peer 50.0.0.1
Pakistan(config-crypto-map)# set transform-set vpntrans
Pakistan(config-crypto-map)# match address vpn-acl
Pakistan(config)#interface Serial1/0
Pakistan(config-if)#crypto map vpn-map

Site to site VPN verfication Commands:

Show crypto isakam sa


Show crypto ipsec sa

Learn about “what is a vpn client


UA-23728446-1